
You have a lecture to review, an interview to quote, or a webinar you want to turn into notes. The information is there, but finding one useful sentence means dragging through the timeline again. Typing everything out would take even longer.
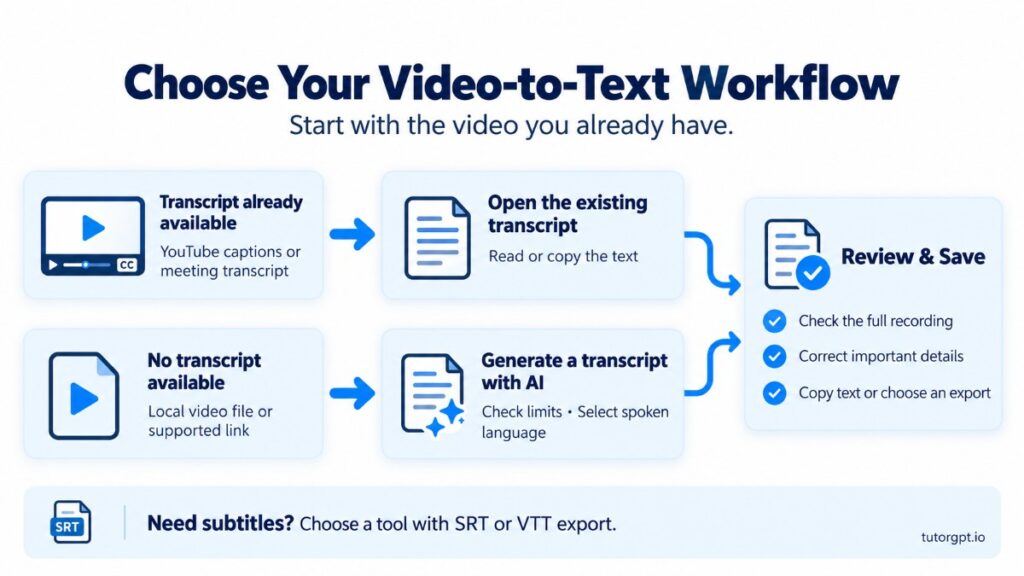
Learning how to transcribe video to text starts with choosing the shortest route for the video you already have. Sometimes the words are available through an existing transcript. Other times, you need a tool that listens to the recording and generates a new one.
The goal is to finish with text you can search, check, and use. This guide walks through that workflow, including free options, common problems, and how to turn a finished transcript into useful notes.
How to Transcribe Video to Text: The Quick Answer
If your video already has a transcript, start there. For a captioned YouTube video, open the description and look for Show transcript. For a recorded meeting, check the platform’s recording files before uploading the video somewhere else.
If no transcript exists, upload the video to an AI transcription tool, select the spoken language, and generate a draft. Check that it covers the entire recording, correct important errors, then copy or save the text.
That is the basic video-to-text workflow. The right method depends on your source and intended output. A readable document works for research or study notes. Subtitles need accurate timing as well as words. Decide which you need before spending time processing the file.
What Can You Transcribe for Free?
“Free transcription” can mean several different things. One service might handle a short recording without registration. Another may offer monthly credits but restrict each upload. You might also have transcription included in software you already pay for.
Before uploading a full lecture, check both the duration limit and the file-size limit. They measure different things: a short, high-resolution video can be larger than a much longer recording with a smaller picture.
Also check whether the allowance resets. Monthly minutes, daily tasks, and one-time signup credits are not interchangeable. Batch processing does not necessarily mean every file in the batch is free.
The final question is whether you can retrieve the complete result. Being allowed to generate a transcript does not always include every download format. If your goal is to transcribe video to text for free, confirm that the free workflow ends with usable text rather than a preview.
For an unfamiliar tool, try a short, representative clip first. Include a technical term, a speaker change, or a slightly noisy section. Then check the result and saving options before committing a longer recording.
How to Get a YouTube Video Transcript for Free
Open the Transcript and Copy the Text
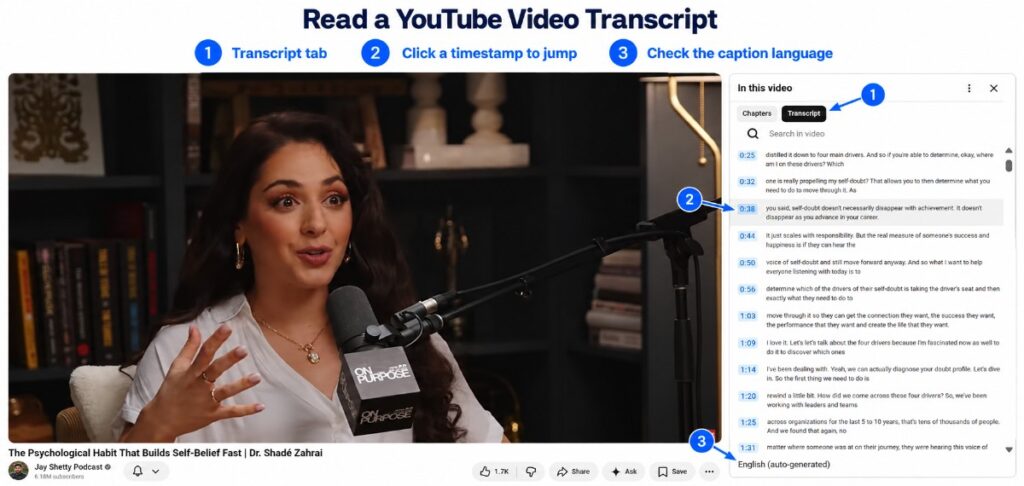
For a video with captions, YouTube’s existing transcript is often the quickest starting point. Open the video description and select Show transcript. The panel displays caption text alongside the recording.
Clicking a line takes you to that moment in the video. This makes the transcript useful even before you copy it. If you only need to verify a quotation or revisit an explanation, you may not need another tool.
To work with the text elsewhere, copy the relevant passage into your document. Depending on the interface, you may be able to hide timestamps first. Otherwise, remove unwanted time labels and fix the short line breaks after pasting.
Keep the video link with your notes. A quotation without its source becomes harder to verify later, especially when several lectures cover similar ideas.
What to Do If “Show Transcript” Is Missing
A missing transcript does not necessarily mean you missed a button. Captions may still be processing, or the recording may not have an available caption track. Poor audio, overlapping speech, and unsupported languages can also cause problems.
This is where extracting captions and generating a transcript become different tasks. A tool that retrieves existing captions cannot recover words from a caption track that does not exist.
To transcribe a video without subtitles, use a service that performs speech recognition on the audio. If it cannot access the link, upload a video file you have permission to use. For your own newly uploaded YouTube video, allowing more processing time may also help.
How to Transcribe a Video File with AI
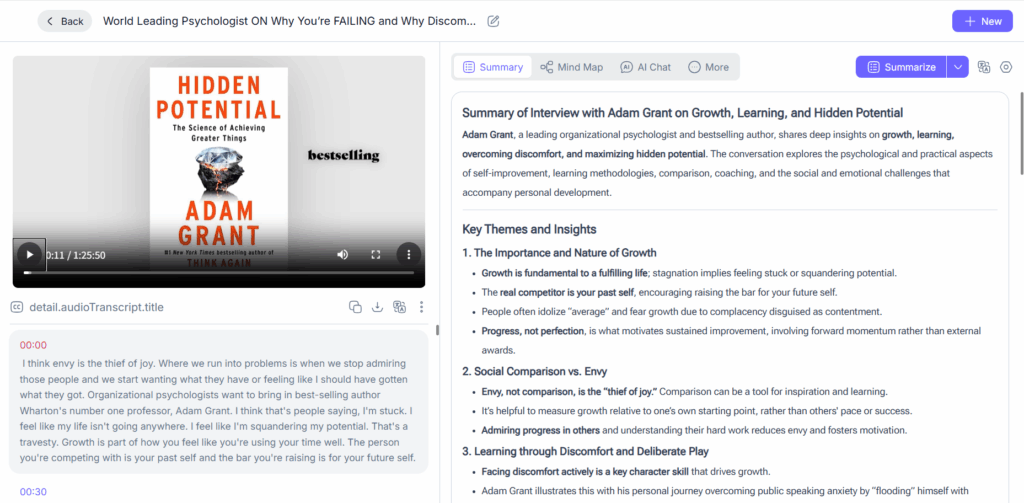
Upload Your Video to TutorGPT’s AI Video Summarizer
Local files need a different route. Perhaps your professor shared an MP4, you recorded a tutorial, or a colleague sent a webinar recording. There is no transcript panel to open.
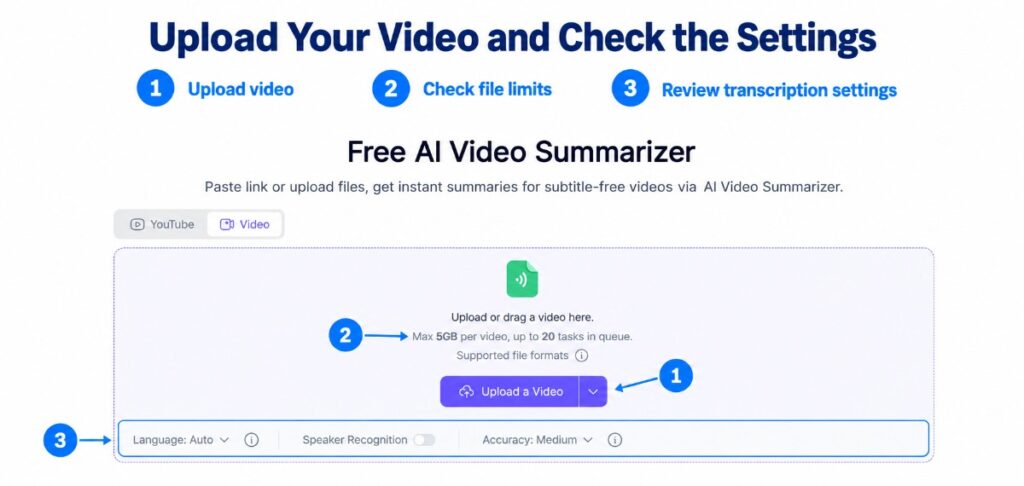
Visit TutorGPT’s AI Video Summarizer and upload your video. The product supports transcription and summarization of videos without existing captions, making it a useful starting point when you need both the spoken content and an easier way to review it.
Check your available credits and current processing limits first. A supported maximum file size tells you what the system can accept; it does not, by itself, establish what your free allowance covers.
You generally do not need to extract audio when the tool accepts your video format directly. Keep that extra step for situations where an upload is too large or the chosen tool requires an audio file.
Select the Spoken Language and Start Transcription
Choose the language spoken in the recording, or use automatic detection where appropriate. Selecting it yourself can help when a clip begins with music, silence, or a brief introduction in another language.
Your desired reading language is a separate choice. If a lecture is delivered in Spanish and you want English notes, the workflow involves transcription and translation—not simply selecting English as the spoken language.
For an interview or panel, use speaker recognition if available. It can make the draft easier to follow, but check the labels afterward. Distinguishing voices does not automatically establish everyone’s name.
Start processing once the input settings match the recording.
Check That the Transcript Covers the Full Video
When the result appears, resist the temptation to judge it by the first paragraph alone.
A transcript can begin convincingly and still stop before the recording ends. Check the final passage against the last spoken section. Then inspect a section in the middle, especially after a long pause or a change of speaker.
For a course recording, make sure the closing explanation or assignment instructions are present. For an interview, check that the final answer has not disappeared.
These checks establish completeness. They do not replace reviewing the details you intend to quote or publish.
Copy or Save Your Transcript
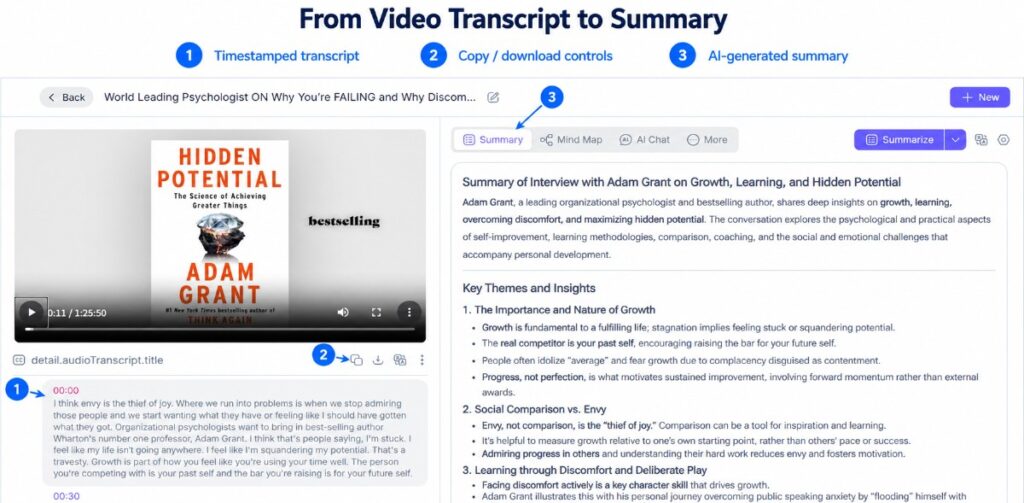
Retrieve the transcript before moving on to the summary. Use the copying or saving options available in your account, and check that the text you retain includes the full recording.
Give it a recognizable name, such as the course, topic, and recording date. Keep the original video nearby or preserve its source link.
If you need subtitles, confirm that your chosen workflow supports a timed format such as SRT or VTT. Saving a transcript as ordinary text does not turn it into synchronized captions.
How to Review and Fix Your Video Transcript
Correct Names, Numbers, and Technical Terms
Automatic transcription saves typing, but a fluent sentence can still contain the wrong word.
Start with information that changes the meaning: a deadline, a dosage mentioned in a lecture, a product name, a research term, or a percentage. “Fifteen” and “fifty” can look equally plausible in an otherwise clean paragraph.
Use known spellings from the course materials, interview brief, or presentation. When a name is consistently wrong, search for its occurrences, but inspect replacements before applying them everywhere.
Avoid asking AI to make uncertain passages sound convincing. If you cannot hear a word clearly, mark the uncertainty and return to the audio. For published quotations or consequential records, review every relevant passage rather than relying on spot checks.
Check Speaker Labels and Overlapping Speech
In a single-speaker tutorial, labels matter little. In a customer interview, assigning a complaint to the interviewer rather than the customer changes the record.
Pay attention where speakers interrupt each other or briefly agree. Those small exchanges can be attached to the wrong person. Correct the labels using the recording and your knowledge of who participated.
If one speaker is missing entirely, check the source file. Multi-track and multi-camera recordings can contain different audio sources. Re-running the same incomplete track will not recover a voice that was never included.
Verify Timestamps If You Need Subtitles
When you transcribe video to text with timestamps, you gain a way to navigate the recording. Subtitle delivery requires closer timing checks.
Watch samples near the beginning, middle, and end. Captions that align at the start may drift later. Also look for sentences displayed too briefly or single words left on screen long after the speaker has moved on.
Correct wording before polishing subtitle breaks and timing. Otherwise, substantial text changes may force you to repeat the alignment work.
What to Do When Video Transcription Does Not Work
The Video Link Is Not Supported
A link that plays in your browser may still be inaccessible to a transcription service. Your browser could be using a login session or private sharing permission that the service does not have.
Confirm that the tool supports that platform and link type. If the recording is yours or you have permission to obtain it, downloading and uploading the file may provide a more reliable route.
Do not make a private recording public just to get a converter to accept it. Use an appropriate file-upload or local workflow instead.
The File Is Too Large or Takes Too Long to Upload
For a large video, first identify whether the delay happens during uploading or transcription. Changing recognition settings will not fix a stalled upload.
Keep the browser open and prevent your device from sleeping until the transfer finishes. On a slow connection, extracting an audio-only copy can reduce the upload size substantially, depending on the format and settings.
Preserve the original recording. If you split it into smaller sections, name them in order and note where each begins. You will need those offsets if you later combine timed transcripts or subtitles.
The Transcript Stops Early or Skips Speech
Compare the stopping point with the tool’s duration allowance. A neat cutoff may indicate a plan limit rather than an audio problem.
If sections are missing throughout, listen to those parts of the source. Quiet speech, competing voices, music, or the wrong audio track may explain the gaps. Try a short affected section separately before processing the whole recording again.
Some systems filter out passages they classify as non-speech. That can help with silence but cause trouble with singing or speech over music. A workflow that handles a clear lecture well may need different settings for a music video.
The Output Is in the Wrong Language
Check the spoken-language setting and whether translation was enabled. Where possible, regenerate a short sample with the correct language selected.
For recordings that switch languages, check the tool’s multilingual capabilities. If necessary, process clearly separated language sections individually.
Once the source-language transcript is reliable, translate it as a separate step. Keeping both versions makes terminology and quotations easier to verify.
How to Turn Your Transcript into Summaries and Notes
Summarize the Main Ideas
A full transcript preserves the discussion, including repetition and detours. A summary helps you decide what deserves attention.
After correcting important errors, use TutorGPT’s AI Video Summarizer to condense the main ideas. A focused instruction is more useful than simply asking for something “short.” For example, ask for the main argument, supporting examples, and unresolved questions.
Keep the transcript available beside the summary. If a conclusion seems stronger than the speaker’s original wording, return to the relevant passage before using it.
Create Study Notes and Check Them Against the Video
To turn a video transcript into notes, organize around what you need to learn rather than the order of every sentence.
For a lecture, that might mean definitions, worked examples, and questions to revisit. For a software tutorial, separate the required steps from optional tips. Ask the tool to flag unclear points instead of filling in missing explanations.
Remember that spoken words may not capture everything shown on screen. A lecturer might point to a diagram without describing it. Add that visual context after checking the video, and keep useful timestamps so you can revisit difficult sections.
Frequently Asked Questions
Can I Transcribe a Video Without Signing Up?
Some tools allow limited use without an account. Check the current duration, file-size, and output restrictions before uploading. An existing YouTube transcript may also meet your needs without a separate transcription account.
Can I Transcribe Video to Text Offline?
Yes. Local tools based on speech-recognition models can process recordings on your computer. Initial installation and model downloads may require internet access. Processing speed depends on your hardware and model choice, and you should check whether optional features still use cloud services.
How Long Does Video Transcription Take?
The total includes uploading, waiting, recognition, and correction. Existing captions can save most of that work. A long, noisy panel usually needs more review than a clear single-speaker lesson. Test a representative section before planning around a deadline.
What Is the Difference Between a Transcript and an SRT File?
A transcript is a readable record of speech. An SRT file divides text into numbered captions with start and end times. Choose a document for reading and notes; choose a timed subtitle format when the words must appear alongside the video.
Conclusion
Knowing how to transcribe video to text starts with the recording you have. Use an existing transcript when one is available, or generate a new draft from your file. Check free limits before uploading, then verify important details and save the complete text in the format you need.
For lectures, tutorials, and webinars, the next step is making that text useful. TutorGPT’s AI Video Summarizer can help you move from a transcript to focused summaries and study notes, while timestamps let you return to the original explanation whenever you need more context.